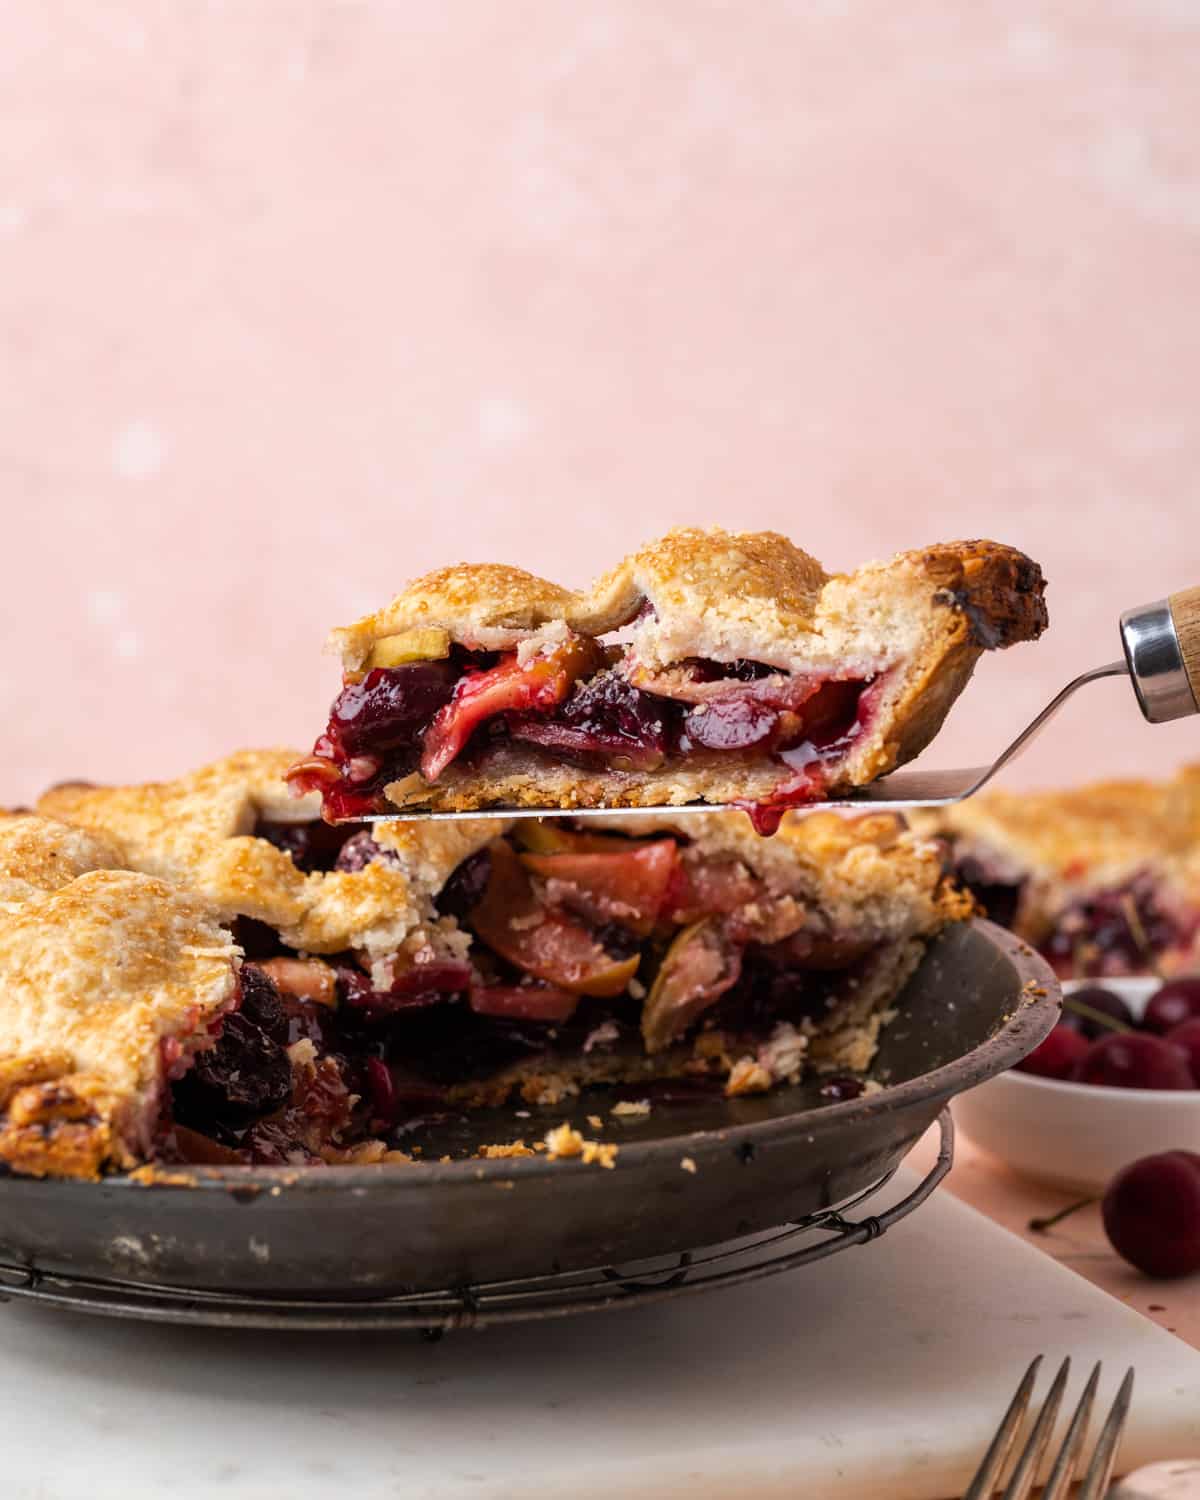
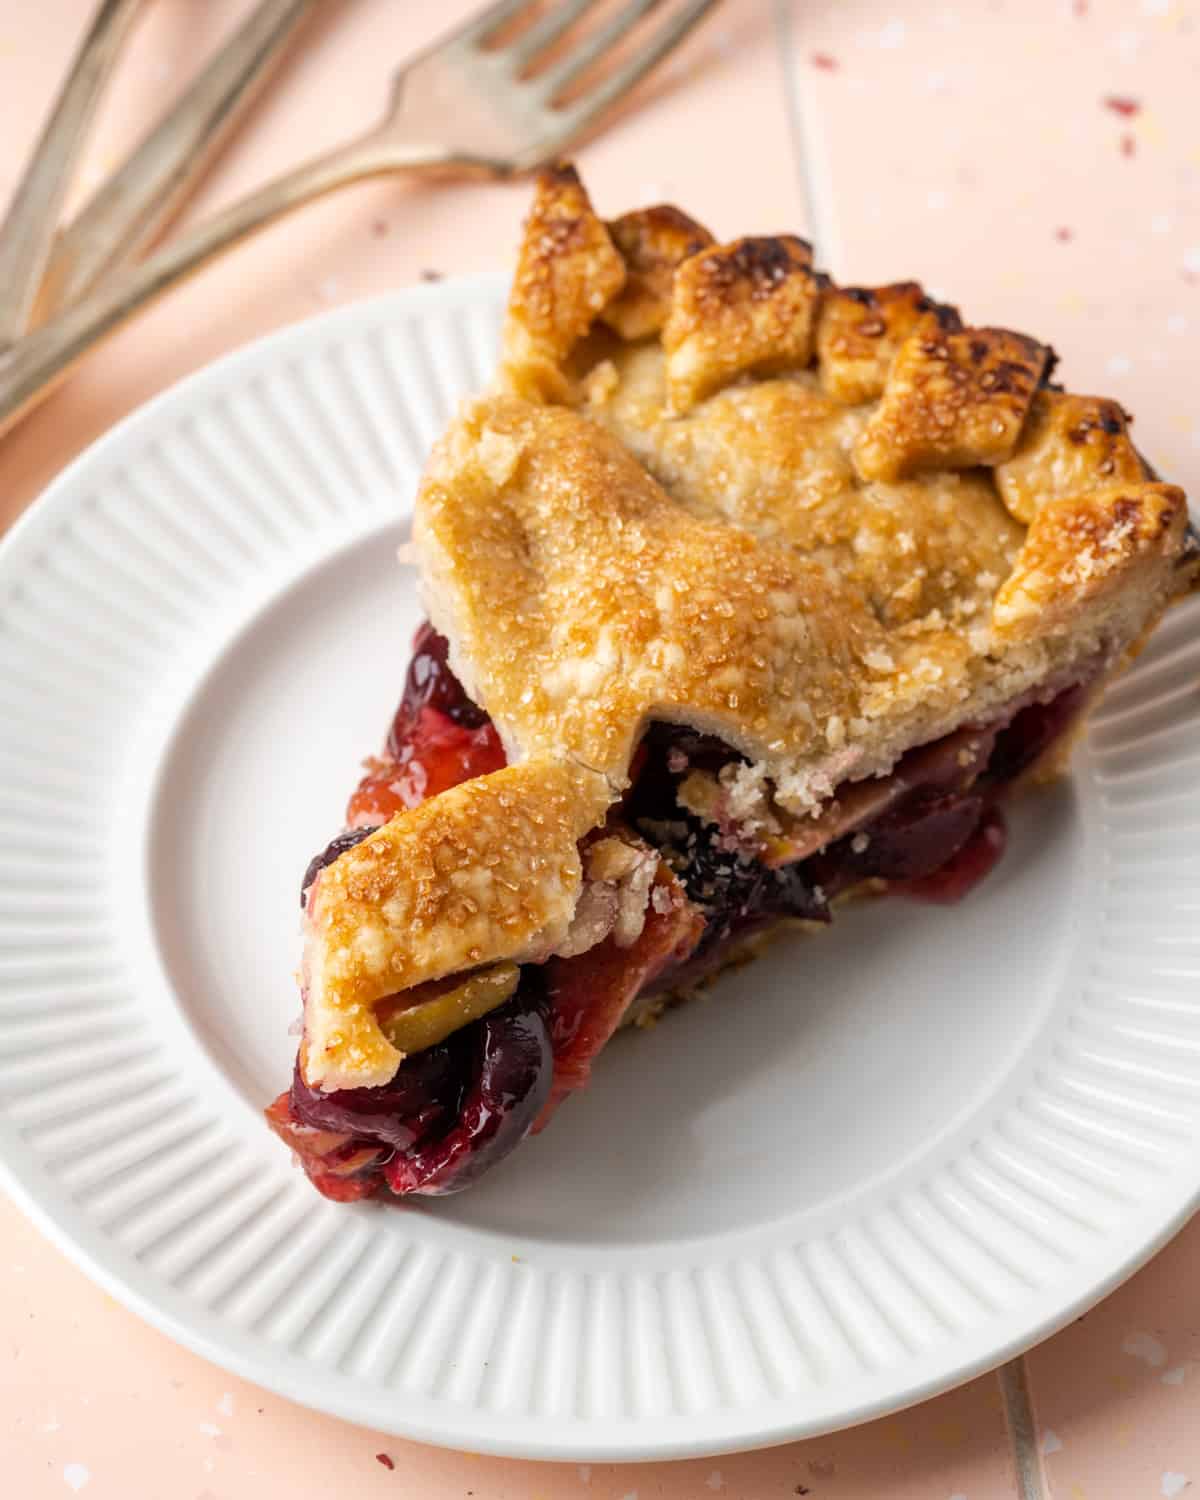
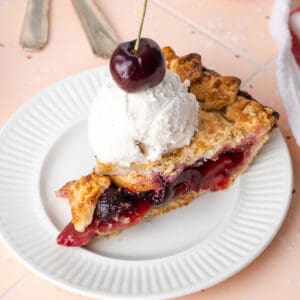
Now that summer is here, I have had a real craving for pie. I keep buying all the fruit and eating it before it comes time to bake. But this week, I had some leftover apples from a photo shoot and a big bag of cherries that were on sale from the grocery store, so I decided to try an apple cherry pie.
Apple cherry crisp is apparently a popular Midwestern US recipe, but I have always had either all apple or all cherry in my pies and crisps. So, I decided to do a little experimenting and come up with my own homemade apple and cherry pie recipe and I am really happy I did. The apples provide just the right amount of tempering for sweet dark cherries. It would be perfect served with vanilla ice cream or whipped cream on top.
If you went crazy buying cherries (like me), then you should also give my cherry almond cake a try. It's perfect for cherry season!
Jump to:
Why you'll love this recipe
- The filling is easy to make and only takes 5 minutes to throw together.
- You can use any pie crust for this pie, but if you use my gluten free vegan pie crust recipe then this pie will be both gluten free and vegan.
- The tart green apples and sweet dark cherries are a perfect compliment to each other.
- The pie filling is naturally gluten free and dairy free.
Ingredients
This apple cherry pie filling only calls for 7 simple ingredients.
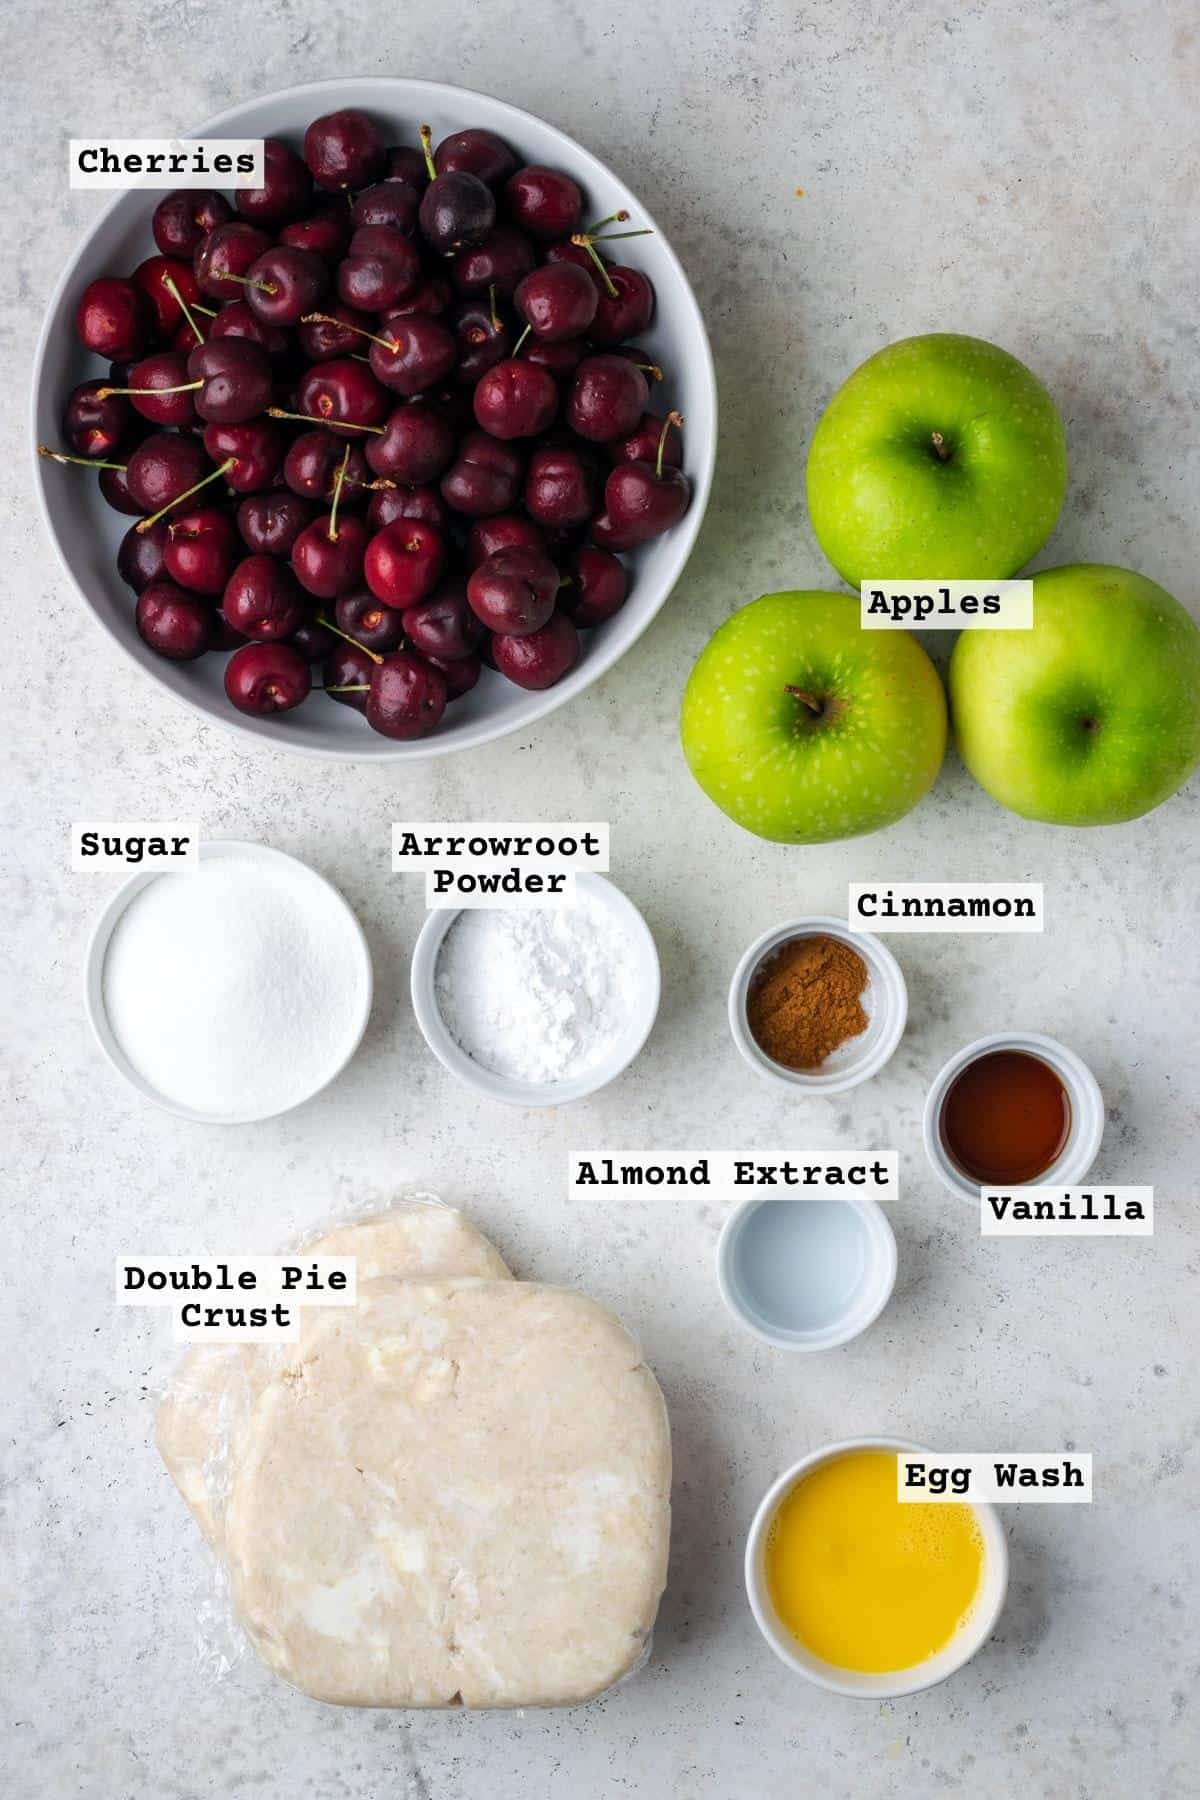
- Sweet Cherries - Make sure to use the dark sweet cherries since they will go really nicely with the tart apples. If you can only find tart cherries (sometimes called sour cherries or pie cherries), then increase the sugar to ¾ cup.
- Green Apples - We are using Granny Smith apples for this recipe since they have a nice tart flavor and they hold their shape well for baking.
- Sugar - Because of the sweet cherries, this pie only uses ½ cup of sugar.
- Arrowroot Powder - I like to use arrowroot powder as my thickener because it makes a clear sauce when it gels. You can also use cornstarch in the same measure.
- Vanilla and Almond Extract - Both just give a little extra depth to the flavor of this pie filling. Almond is a natural match for cherries.
- Cinnamon - To compliment the apples in the pie.
- Egg Wash - a single beaten egg to make our crust shiny and golden brown.

Substitutions & Variations
- Make it Vegan - To make this pie vegan, either omit the egg wash or replace it with a vegan "egg wash" comprised of 2 tablespoons of non-dairy milk mixed with 1 tablespoon of maple syrup.
- If you want more apple pie combinations, try out my apple blueberry pie, apple cranberry pie or apple pear pie.
How to make a cherry apple pie
For this recipe, I have used my favorite gluten free & vegan pie dough. If you check out the post there are step by step instructions and a video to help you master your own gluten free pie crust.
Once you have your pie crust sorted, make this apple cherry pie filling could not be easier.
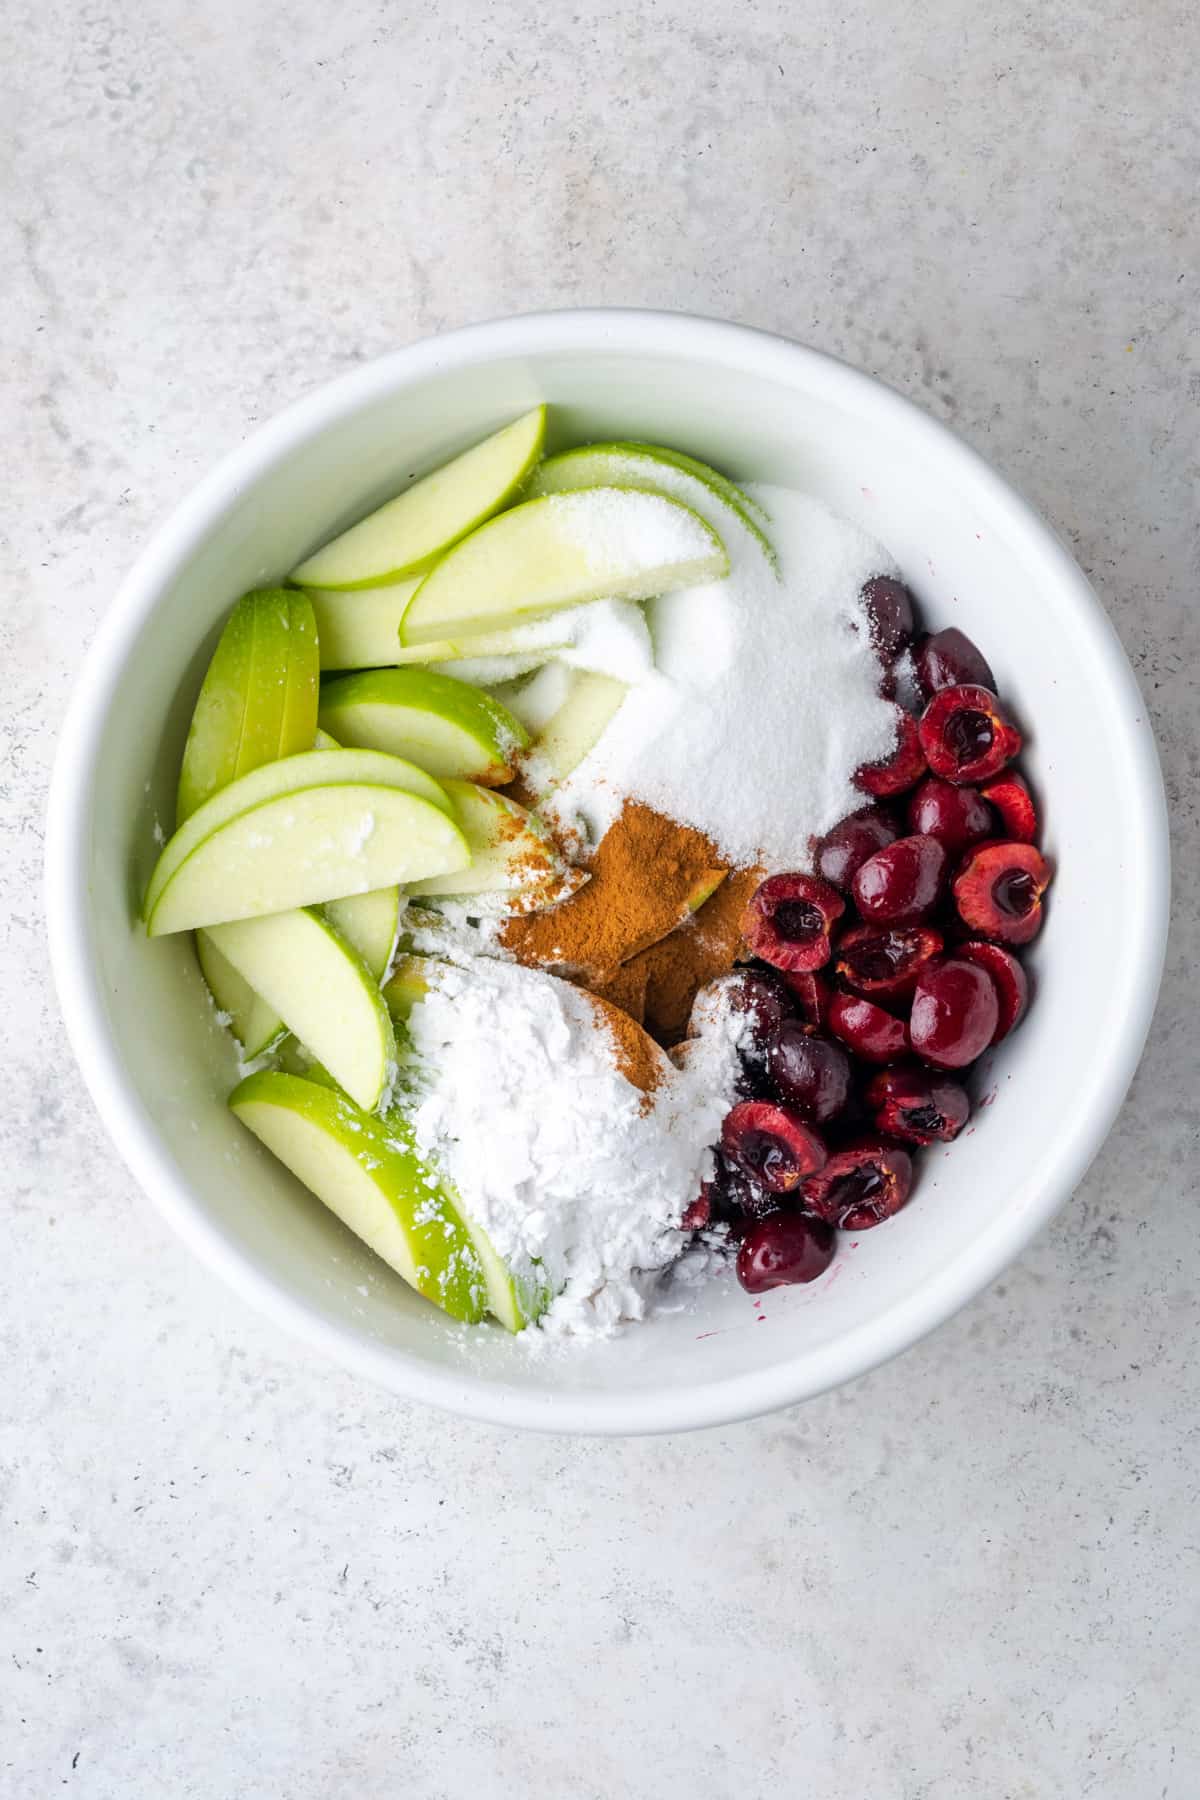
STEP 1: Add the apples, cherries, arrowroot powder, sugar, cinnamon, vanilla and almond extract to a large mixing bowl.
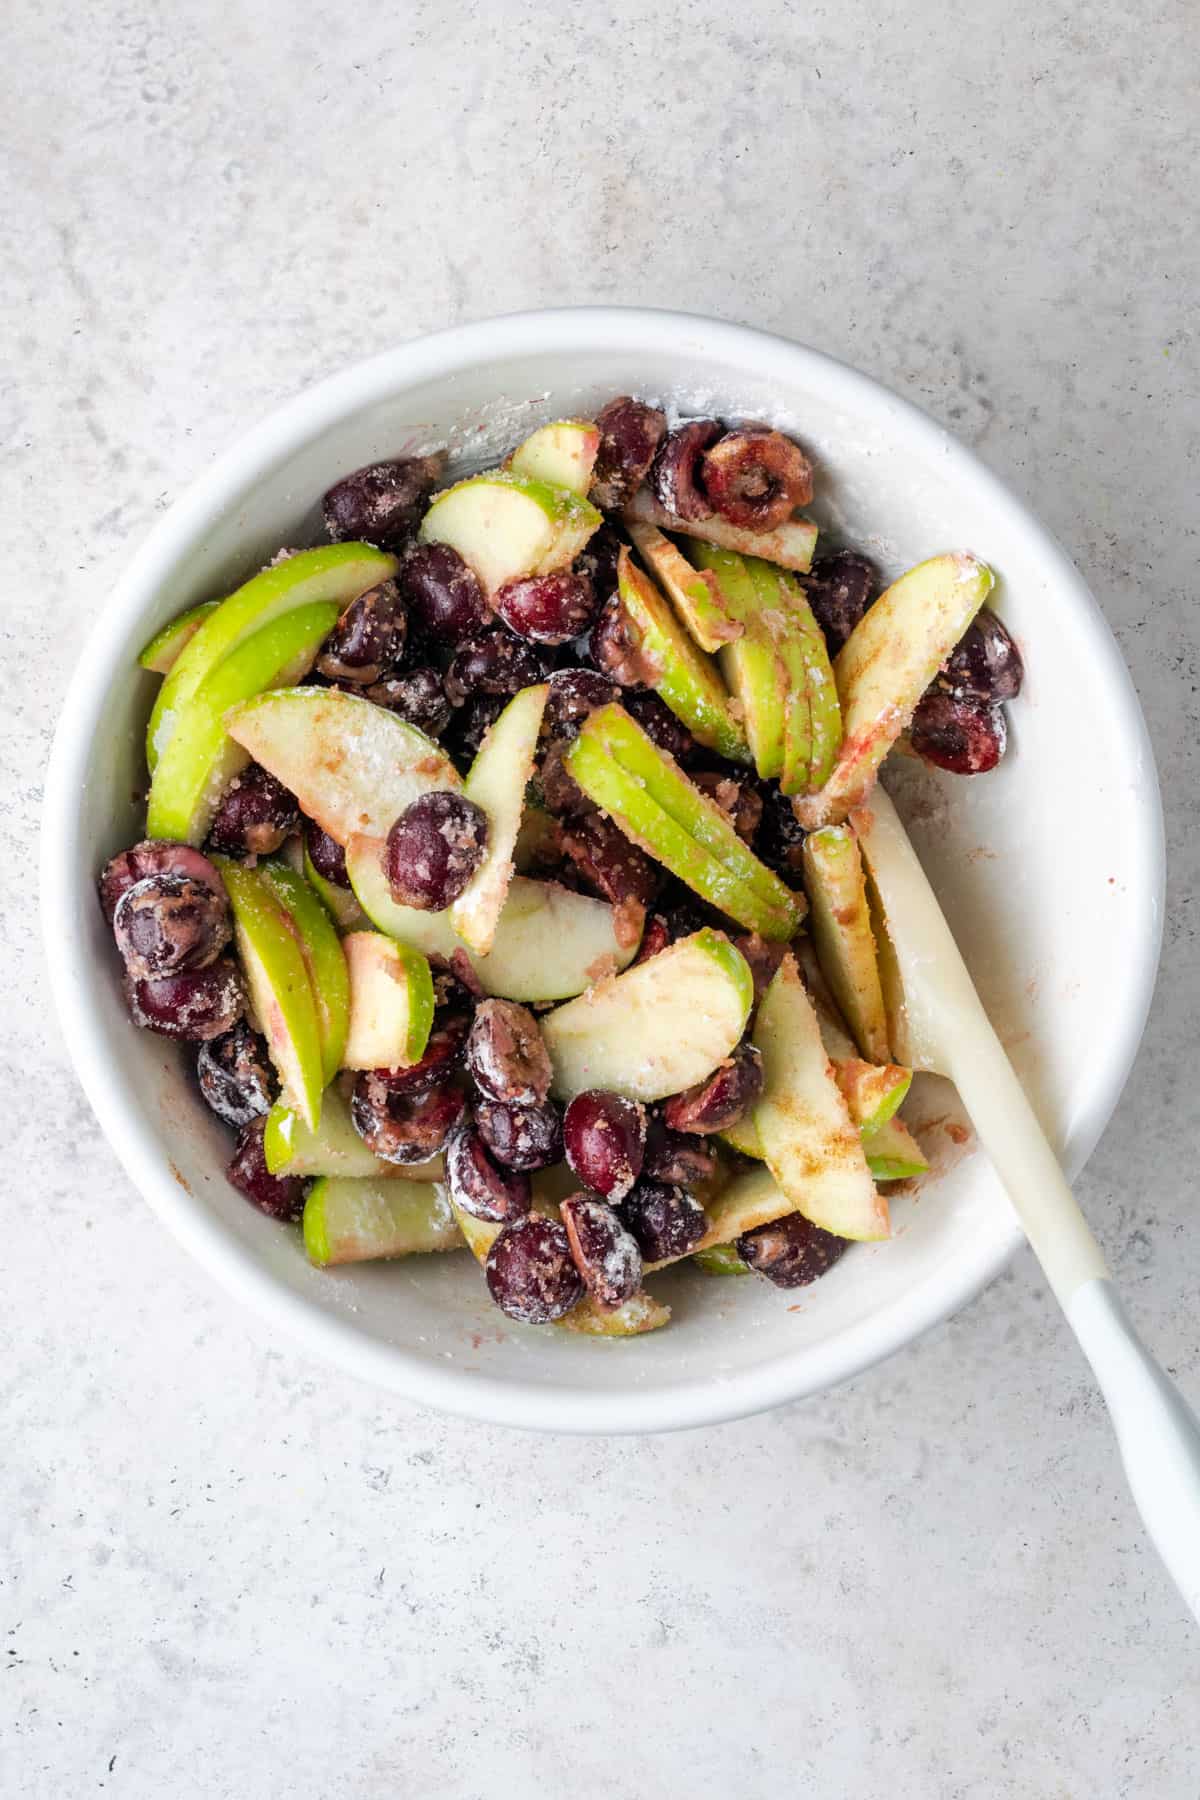
STEP 2: Stir everything together, making sure all of the fruit is coated with the dry ingredients.
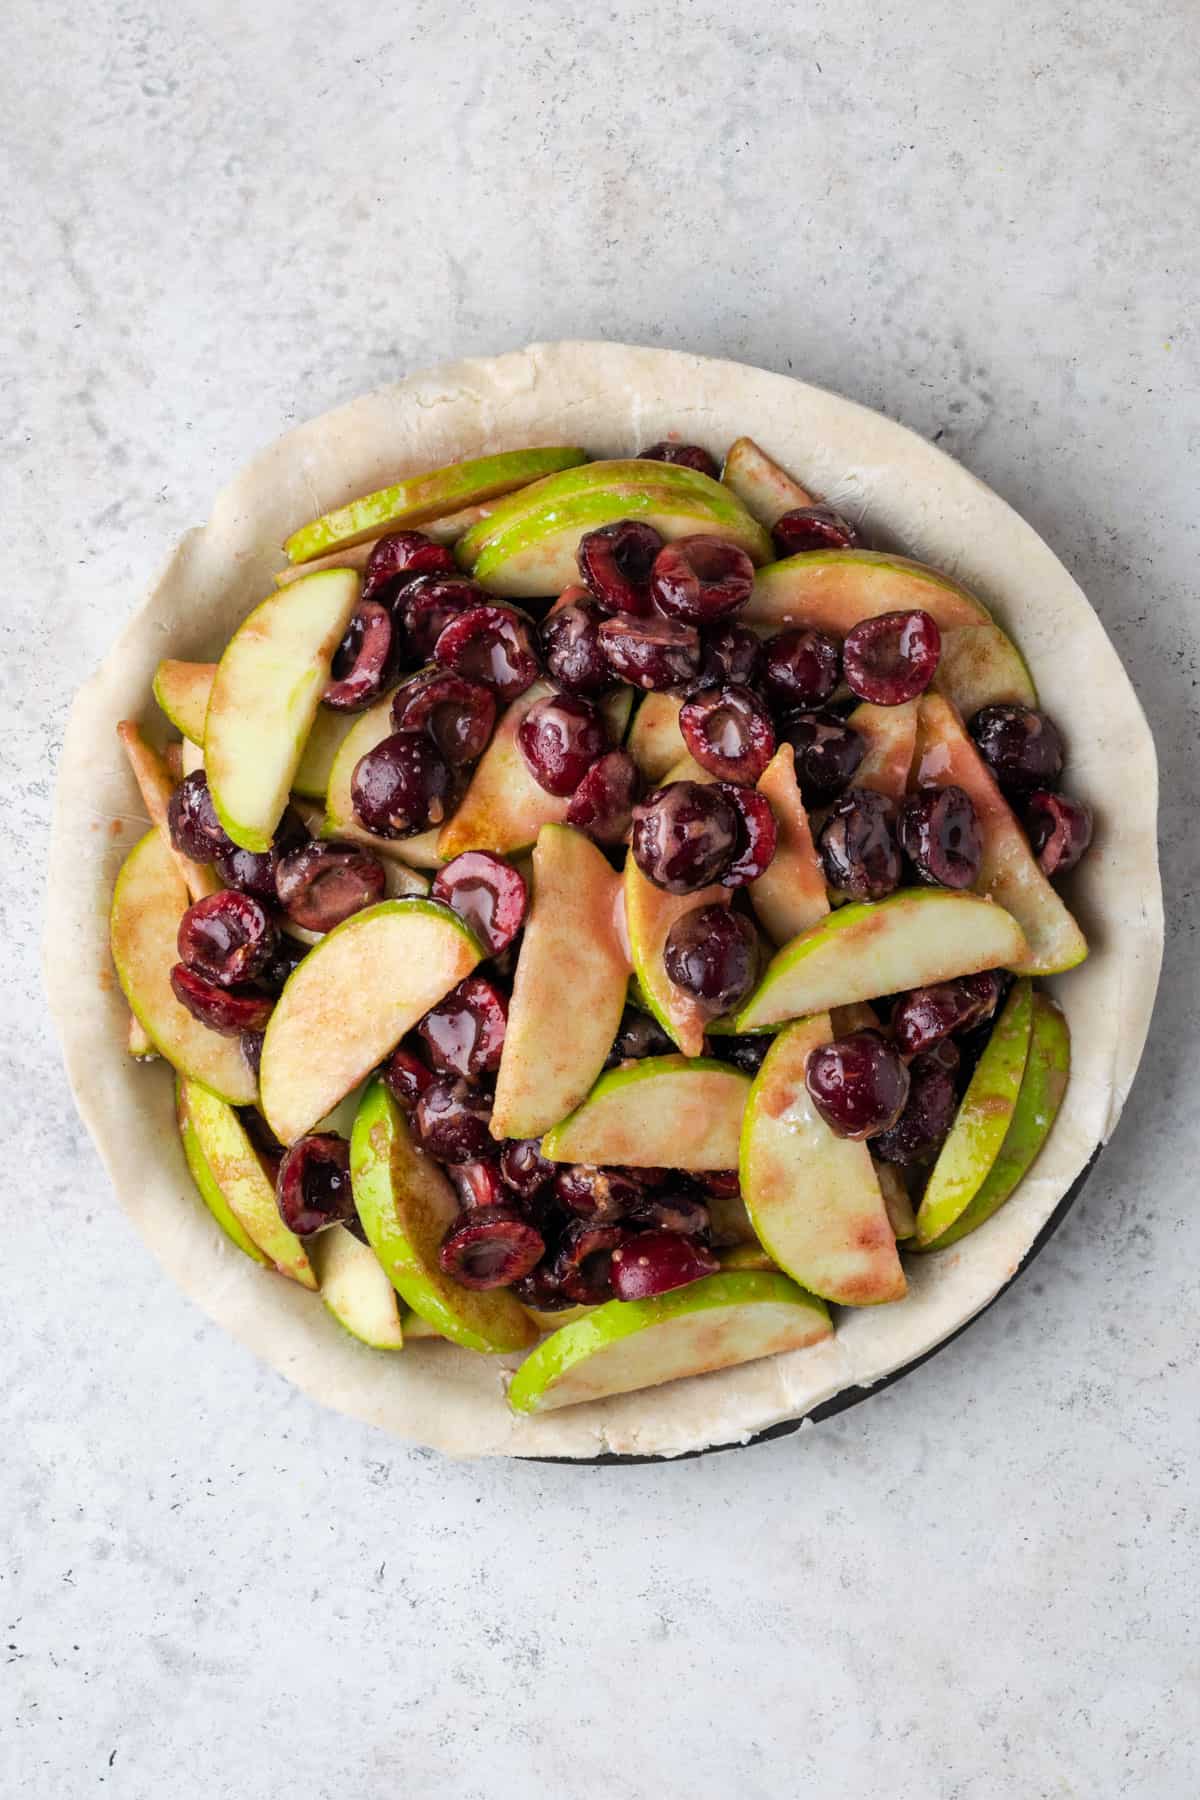
STEP 3: Transfer all of the pie filling to an unbaked pie crust.
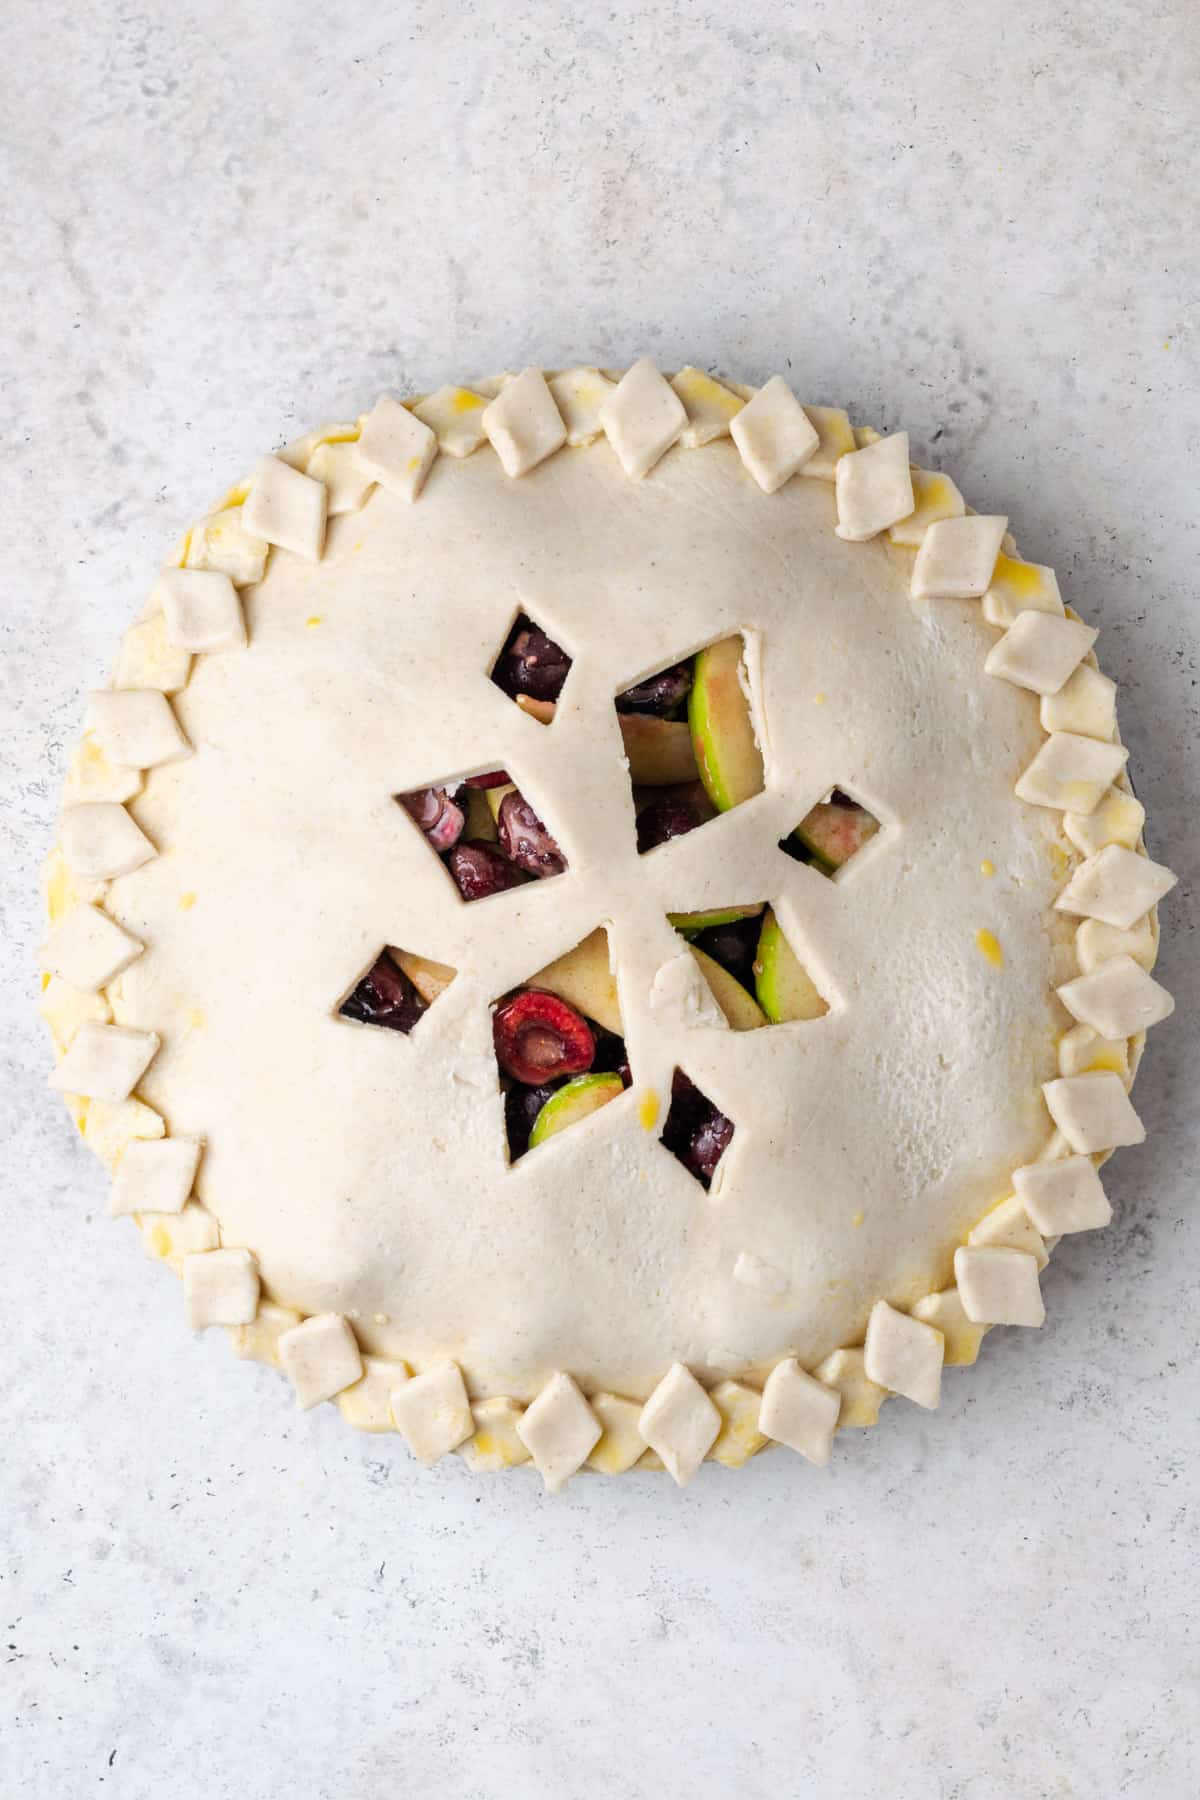
STEP 4: Place the top pie crust over the filling, decorate or crimp in your favorite design.
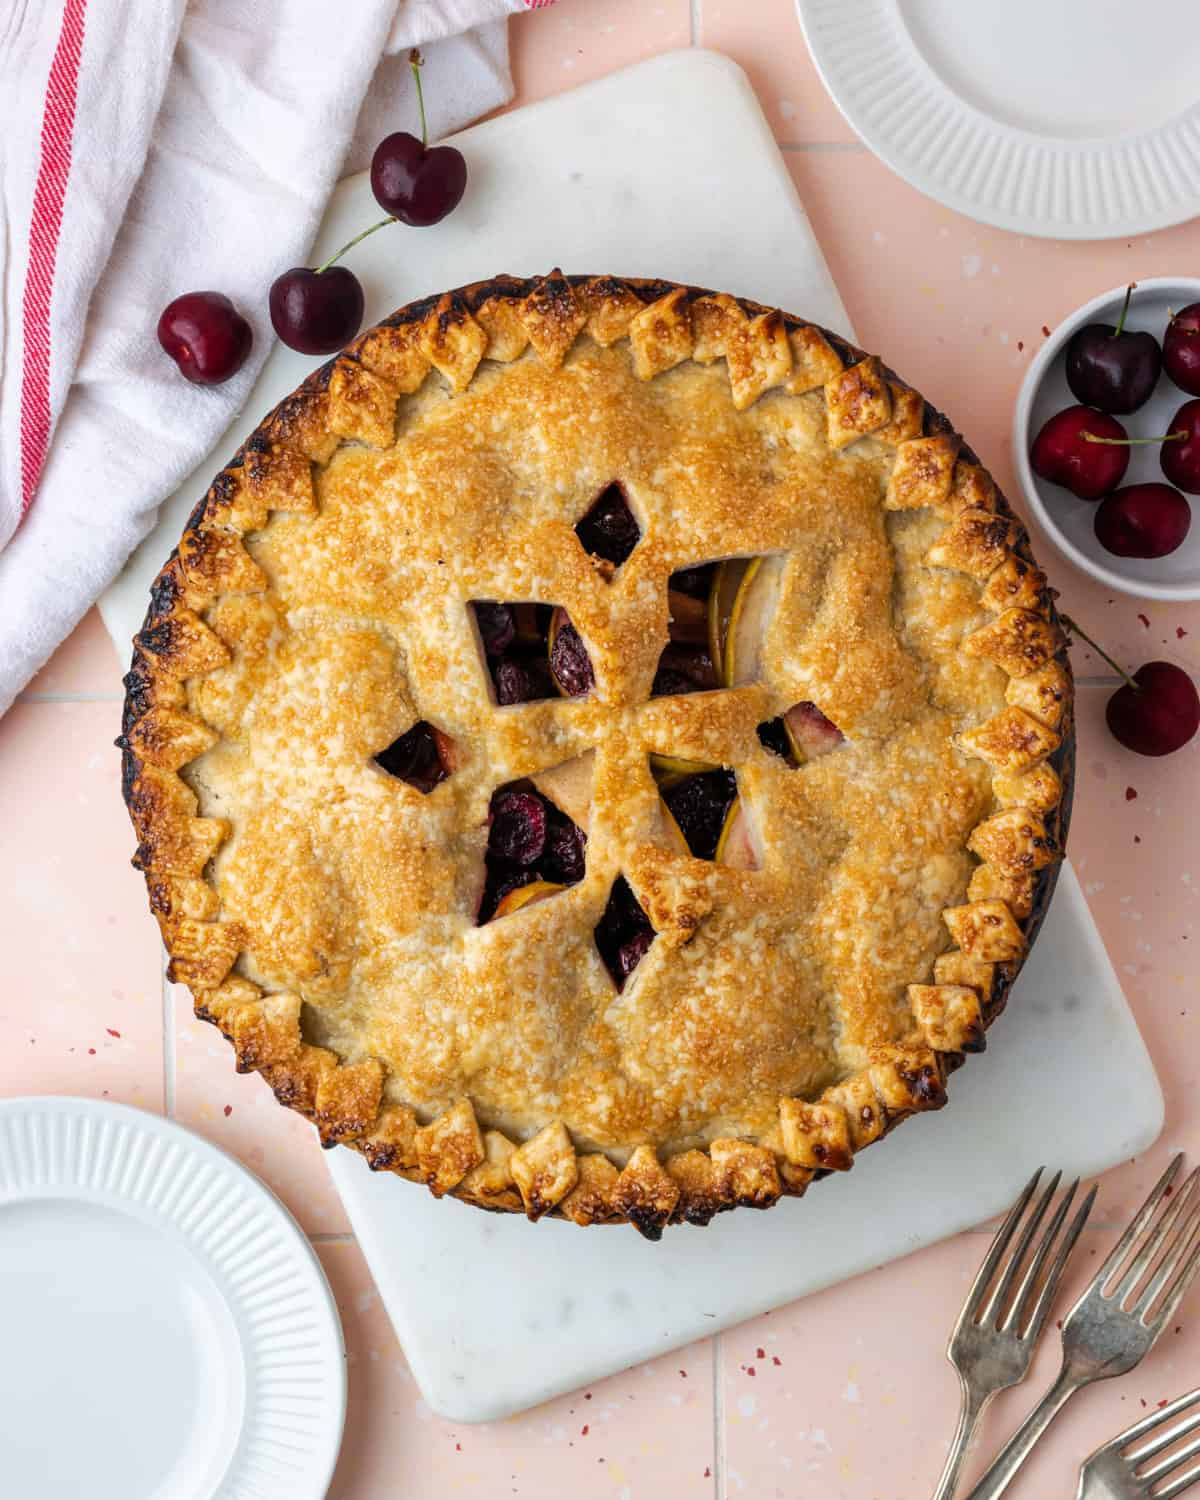
STEP 5: Brush the top crust with egg wash and sprinkle with turbinado sugar, if using. Place the pie on a baking sheet and bake.

Baking Tip
For the flakiest crust, place your prepared pie in the freezer for 15 minutes while your oven preheats.
How to make this pie crust design
This design looks fancy, but it is very easy to achieve. Roll out your top pie crust and use diamond shape cookie cutters to make the center cuts.
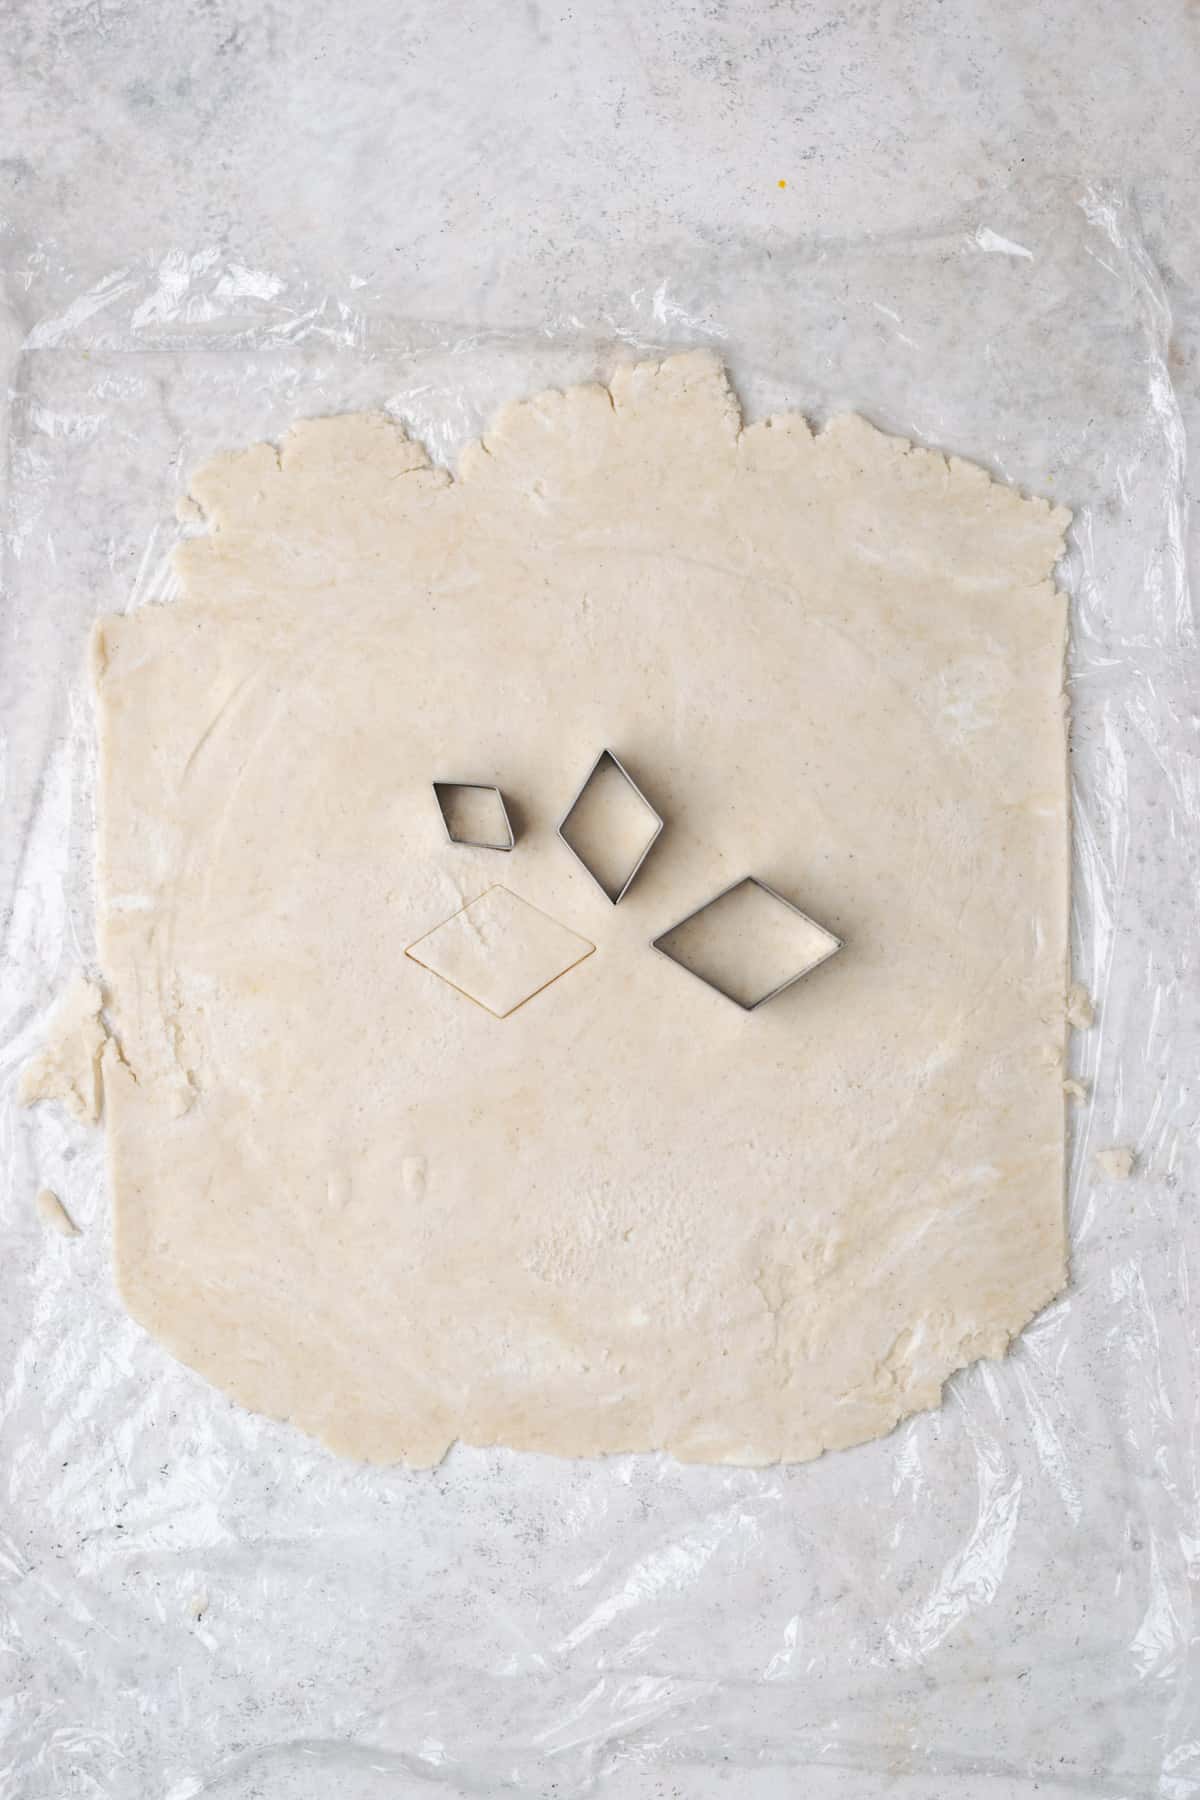
Then place the dough sheet over the pie filling and trim the edges. There should be enough dough to roll out again and use the smallest cutter to make many diamonds to line the edge of the crust. Attach all of the diamond shapes with a brush of egg wash to hold them in place.

Recipe FAQs
In a traditional cherry pie, you do cook the filling before adding it to the pie crust for baking. However, in this recipe all of the ingredients go together uncooked and they do the cooking in the oven.
Ideally, yes. A refrigerated cherry pie will last for about 3 days. You can always reheat a slice if you prefer it to be warm.
Preheat your oven to 350 degrees. Cover the pie with aluminum foil and bake for about 30 minutes or until the center is warm.
For food safety, you can only do this once. Do not reheat, then re-refrigerate leftover food.
Yes. You can prepare and bake the pie. Allow it to cool, then wrap the pie in several layers of plastic wrap and place in the freezer. It will be good for 3-6 months.
When you're ready to serve the pie, that it overnight in the refrigerator then reheat according to the directions above. Allow the pie to cool for at least 30 minutes before slicing to keep the crust in tact.
No, if you want to enjoy this pie year round, you can use canned sweet cherries (they are usually sold with the canned fruit in the grocery store). You will need three 14.5 ounce cans for this recipe.
More pie recipes to consider:

If you try this recipe, please leave a 🌟🌟🌟🌟🌟 star rating and let me know how you liked it in the comments below.
Recipe
Apple Cherry Pie
Ingredients
For the pie filling
- 4 Cups Dark Sweet Cherries pitted and sliced in half
- 3 small Apples sliced into ¼" thick wedges
- ½ Cup Sugar
- ¼ Cup Arrowroot Powder
- 1 teaspoon Vanilla
- ½ teaspoon Almond Extract
- 1 teaspoon Cinnamon
- 1 Egg beaten, for egg wash
- Turbinado Sugar optional
Instructions
To make the pie crust
- Roll out your bottom pie crust and gently work it into the shape of the pie pan. Once your pie shell has been created, trim the edges to the lip of the pie tin. Return the pie shell to the freezer.2 Gluten Free Pie Crust
To make the filling
- Add all of the filling ingredients to a large bowl. Mix together until the fruit is evenly coated with the dry ingredients.4 Cups Dark Sweet Cherries, 3 small Apples, ½ Cup Sugar, ¼ Cup Arrowroot Powder, 1 teaspoon Vanilla, ½ teaspoon Almond Extract, 1 teaspoon Cinnamon
- Spread the filling into the frozen pie shell in an even layer.
To assemble and bake the pie
- Remove the second half of your pie dough. Roll it out into a sheet and place it in the freezer for 15 minutes. While it is still frozen cut your shapes out of the dough with a sharp knife or cookie cutters as I did in the photos.
- Place the top pie crust over the filling. Use egg wash to seal the edges. Trim the edges and re roll the scraps to cut out the diamond shapes for the crust edge.1 Egg
- Continue to place the remaining shapes, using egg wash to stick pieces of dough together.
- Once complete, egg wash the entire top of the pie crust and sprinkle with coarse sugar (optional). Place the pie in the freezer while you preheat the oven.Turbinado Sugar
- Preheat the oven to 425 degrees.
- Place your prepared pie on a baking sheet and bake on the bottom rack of the preheated oven for 45 minutes. Cover crust with foil if it starts to get too brown before the time is up.
- Cool at least 4 hours before slicing.
Notes

Tiffany is the recipe developer, stylist and food photographer behind Well Fed Baker. As a lifelong baker who had to go gluten free and dairy free in 2016, Tiffany strives to share allergen friendly recipes that never feel like they are free from anything.
Christina says
This our pie was delicious! The crust was amazing and the filling was not too syrupy sweet like some cherry pies.
Karen says
This pie was one of the best I've ever made!
When looking for pie recipes to use up apples and cherries I had, most of them required a step on the stove cooking and cooling, which I wanted to avoid. A lot of them were loaded with sugar, which I usually have to adjust so it's not so sweet. This recipe seemed to be exactly what I was looking for - it was simple, just the right amount of sugar, and it turned out perfect!!!
Note: I made my crust with sourdough discard and I didn't have enough cherries so I added more apples to make up the difference. I'm excited to make it again with more cherries next time!
Thanks for this amazing pie recipe and for your beautiful photos, which inspired me to get creative with my top crust - I will definitely be making this recipe again and again!
Seeing your comment has made my whole day, Karen. Thanks for much for sharing and I'm really happy you loved the recipe 🙂
max says
This pie was amazing thank you so much for posting it!