Back in my gluten days, I was a real donut addict (doughnuts, too)! For years, I lived next to a grocery store and almost everyday I would walk over there and buy two donuts and a small milk. Needless to say, my waistline was not happy with all that donut love. So, it was a bit of a godsend when I had to give up gluten, because it made it a lot easier to break my donut habit. Don't get me wrong, if a gluten-free donut place opened in my town, I would be a regular customer. What is not to love about fried dough? And I do mean fried, because baked donuts are nothing but circular shaped muffins. Yeah, I said what I said.
Do donuts have to be fried?
The short answer is no. But for the occasional treat, why not go for the real thing. It's not scary to fry up some donuts at home. It's no harder than making french fries and definitely easier than frying chicken. With a few tools you can definitely handle this recipe.
First, I suggest user a cast iron pan or a dutch oven. Both are made of cast iron, which will keep a more even heat than a stainless steel pan. You want something that has enough depth to get about 2 inches of oil.
Second, get a thermometer. The kind you use for candy or oil. I have this one. The key features you're looking for in a thermometer is an easy to read display and a clip to hold it on the side of the pan. Now, Grandmas the world over have been known to fry without any thermometer but I just don't fry often enough to have those skills.
The third thing that will be super helpful is a strainer/spider. If you have no idea what that is, click here. This has a nice long handle so your hands don't get close to the hot oil and the little web design lets the oil drip off easily.
The last tool is totally optional, a donut cutter. Similar to a biscuit cutter with a second hole in the center. I actually don't own one of these. I use a 2 ½" biscuit cutter and a small circular cookie cutter to make my donuts. You can really use anything that's round and sharp enough to cut dough.

How to make gluten free fried donuts
Here are a few tips to help you have better donut frying success:
- Make sure your pan is big enough that 3 donuts won't be crowded in there. You want them to float around and for you to have room to get in there with your spider to flip them. I use a 10 inch cast iron that is 3 inches deep.
When heating your oil, it will take a while for the temperature to build. But once it is over 300 degrees it will start climbing fast. At this point, reduce your stove temperature a little. You don't want to miss your frying window or overheat your oil.
Keep a close eye on the oil temperature at all times. It will fluctuate. Anywhere between 350-375 degrees will give you a good outcome. Under 350 will come out greasy and over 375 will be burnt and possibly undercooked inside.
Your oil temperature will drop every time you add cold dough. So, don't add more than 3 donuts at a time.
Keep a little bit of room temperature oil set aside. If your oil temp climbs too high, not only can you reduce the stove temperature but you can pour a little of the cold oil in to help drop the temperature.
Place your cut out donuts on individual squares of parchment paper. You can slip the whole thing into the oil, which cuts down on your risk of getting burnt as well as reducing the chance of the oil splashing. Just use your spider to fish out the paper, it will separate from the donut immediately on entering the oil.
Set up your drying area before you start. Once things are frying, you don't want to leave the stove. I use a baking sheet double lined with paper towels.
If you're frying on an open flame, like a gas stove, please keep a fire extinguisher handy. A grease fire can easily break out if you accidentally slosh oil out of the pan, etc. Just try to be extra careful!

How do you store leftover donuts?
Unfortunately, donuts lose their appeal pretty quickly. It's best to serve them within a couple of hours of cooking.

Recipe
Gluten Free Pumpkin Spice Donuts
Ingredients
For the donuts
- 2 Cup Gluten Free 1-to-1 Flour Blend
- 2 teaspoon Baking Powder
- ¼ teaspoon Baking Soda
- ½ teaspoon Salt
- 2 teaspoon Pumpkin Pie Spice
- ½ Cup Light Brown Sugar
- 3 Tablespoon Unsalted Butter melted
- 1 Egg
- ½ Cup Pumpkin Puree
- ⅓ Cup Non Dairy Milk
- 1 teaspoon Vanilla
- 2 quart Canola Oil
For the glaze
- 2 Cup Powdered Sugar
- ¼ Cup Maple Syrup
- 1 teaspoon Cinnamon
- 2 Tablespoon Non Dairy Milk
- 2 Tablespoon Light Corn Syrup
Instructions
For the donuts
- In a microwave safe dish, melt the 3 tablespoon butter. Set aside to cool while you're mixing your ingredients.
- In a large bowl, combine 2 C flour, baking powder, baking soda, salt, pumpkin spice and brown sugar. Stir well to mix.
- In a small bowl, whisk your egg until frothy. Add the pumpkin puree, milk, vanilla and melted butter. Whisk until mixture is well combined and smooth.
- Pour wet ingredients into dry. Fold together with a spatula. At first it will seem way too dry, but keep gently working it until all the flour is incorporated.
- Cover bowl with plastic wrap and place in the refrigerator for 2 hours (or overnight).
- After your dough has chilled, lightly dust your workspace and turn dough out. You may need to sprinkle a little flour on top as well if it's sticky. Don't go crazy with the dusting because it will give you flour coated donuts. Gently pat down the dough, similar to how you make biscuits. You don't want to squish all the air out. Pat your dough until it's about ½" thick. Dip your cutter in flour and cut out your circle (or whatever shape you want). Place cut outs onto individual squares of parchment paper. You should be able to get about 12-2 ½" circles out of this dough. If your circles are larger, you will have less than a dozen.
- Place the cut out circles onto a baking sheet and keep in the refrigerator until you're ready to fry.
- Attach your thermometer to the side of your frying pan. Add the 2 quarts oil and turn to medium heat.
- While the oil is heating prepare your work space. You will need one baking sheet double lined with paper towels. If you're glazing your donuts, you will also want a second baking sheet with a cooling rack inset to allow the glaze to drip while it dries.
- Once your oil has reached at least 360 degrees, you're ready to start frying. Add the first 3 donuts to the oil Watch the temperature and adjust your stove accordingly. Remember to keep your oil in the range of 350-375 degrees. The donuts will sink at first and then they will begin to float. Once they are floating you will cook about 1-2 minutes and then flip them over and cook about 2 minutes more on the second side. The donuts should be a nice brown color when they are done. Remove from oil to the paper towel lined tray to drain. Repeat with additional donuts. Keep an eye on your oil the whole time. If it is too cool, wait for the temperature to rise before adding more donuts.
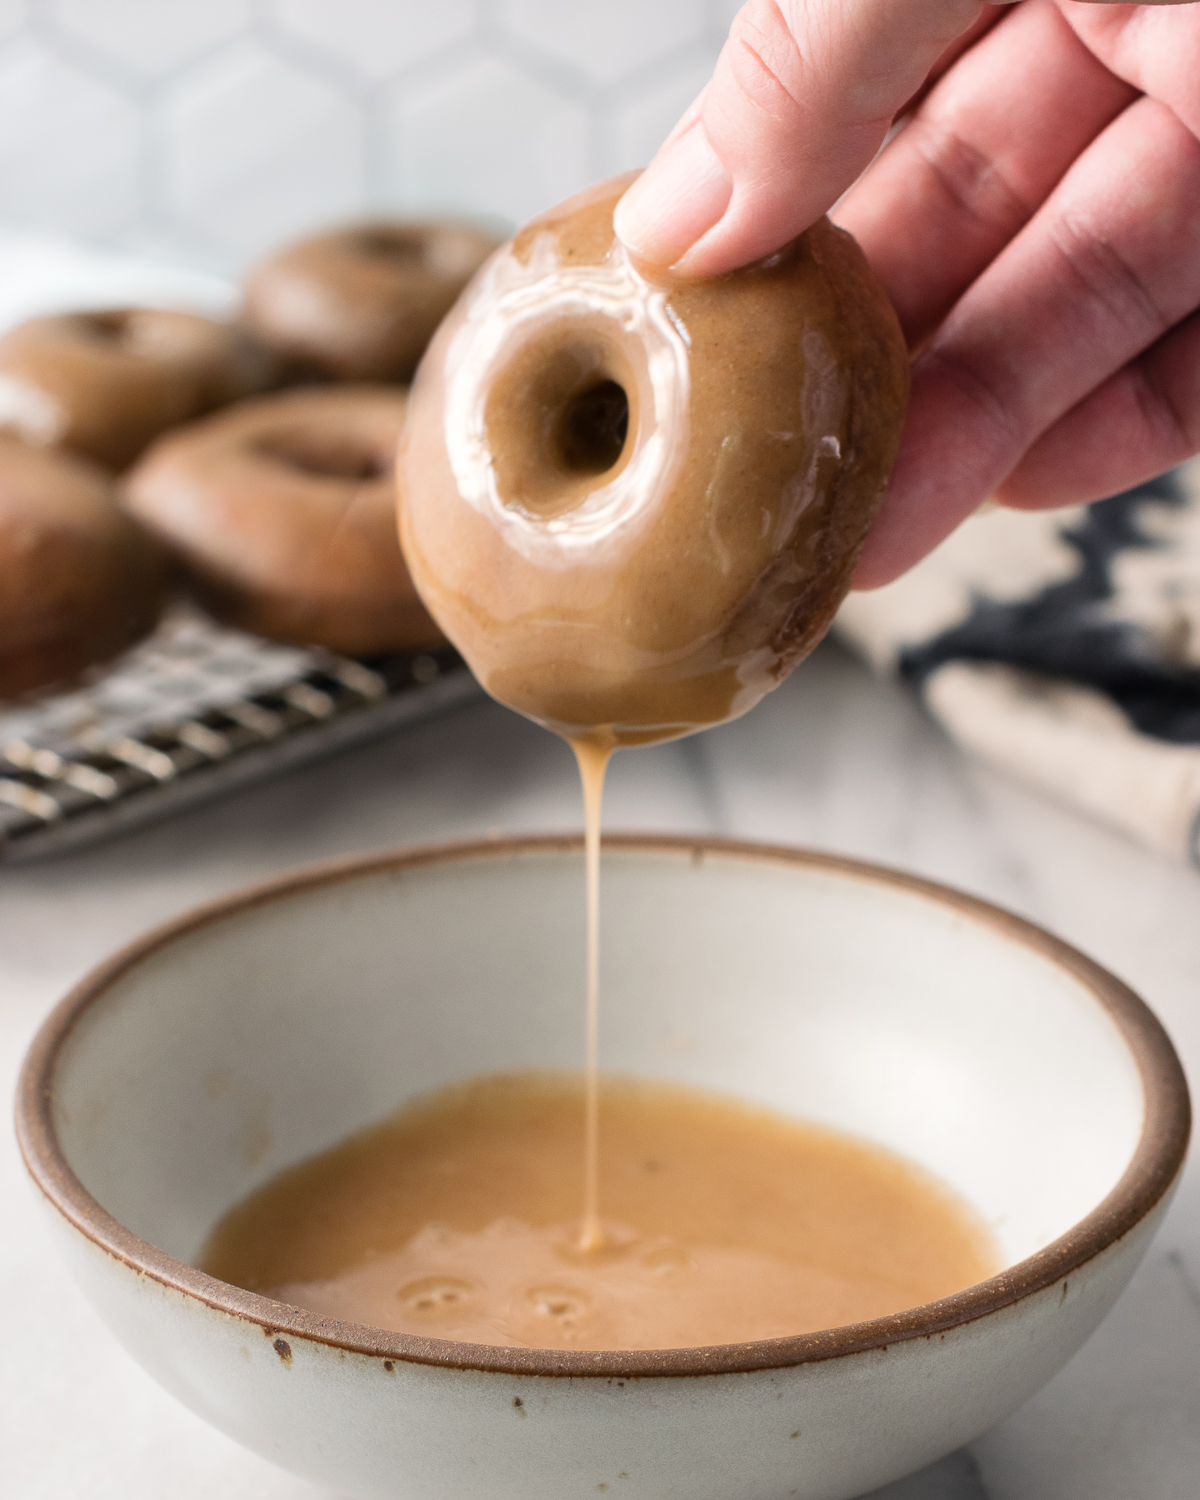
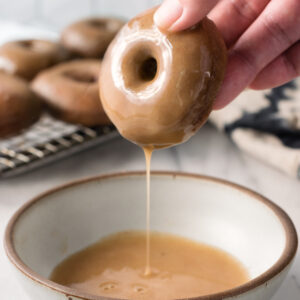
- After the donuts have drained for a few minutes, dip them in the glaze coating both sides and place on the cooling rack/baking sheet to drip dry.
- This recipe makes 12-2 ½" circle donuts. Store in a loose container (like a bakery box) for 1-2 days.
For the glaze
- In a bowl that's wide enough to dip your donut, combine the powdered sugar, maple syrup, cinnamon and corn syrup. Add the milk a little at a time and whisk together. You want the glaze to resemble Elmer's glue consistency, so take care not to make it too wet.

Tiffany is the recipe developer, stylist and food photographer behind Well Fed Baker. As a lifelong baker who had to go gluten free and dairy free in 2016, Tiffany strives to share allergen friendly recipes that never feel like they are free from anything.
Leave a Comment